STEPS TO FILL AADHAAR ENROLMENT FORM
Aadhaar card has now become the most mandatory ID proof in India. For address verification, identity verification, to open a bank account and many other actions, it is mandatory to hold an aadhaar card.
In that case, the information listed on the card should be clear and accurate. At the same time, we should also be aware of how to apply for a new aadhaar card.
In this article we will show you how to download and fill an aadhaar enrolment form.
What is an Aadhaar enrolment form?

When an individual is in need of a new aadhaar card or wants to make changes to the previously printed aadhaar card, it is necessary to fill an aadhaar enrolment form which is provided by the UIDAI.
This aadhaar enrolment form can be filled in two ways.
a. Offline: The form is downloaded from the website, which is filled manually and submitted at the enrolment centers.
b. Online: The form is filled and submitted via the UIDAI official website.
Particulars in Aadhaar enrolment form:
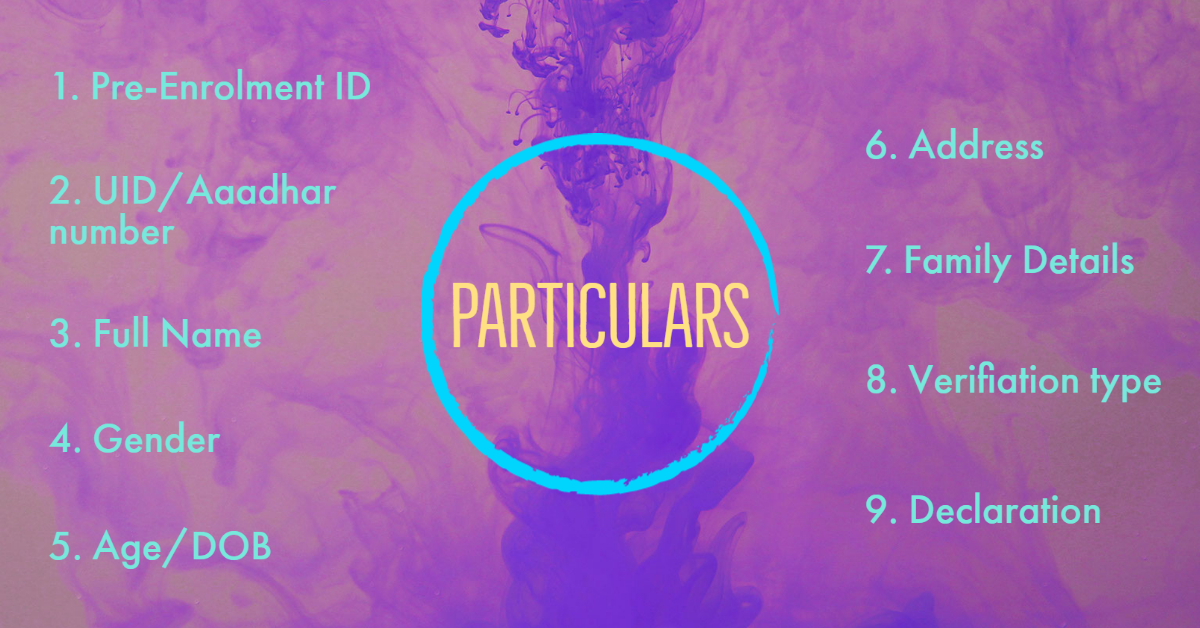
Aadhaar enrolment or correction forms contain 9 particulars that must be filled out. Let’s look at what each particular means
1. Pre-enrolment ID: This is an acknowledgement number that is provided at the enrolment center, which is essential to apply for an Aadhaar card.
2. UID: UID is Unique Identification number, which is nothing but the Aadhaar number. In the event of an update, this should be provided.
It is mandatory and free for a person to update their biometrics if they choose to do so. Other than that you can also update details such as mobile number, DOB, address, name, gender and email address.
3. Full Name: Your full name should be included with your initials. Make sure there aren’t any mistakes.
4. Gender: Select your gender
5. Age / Date of Birth: Mention your age and DOB in DD/MM/YYY format. A person's age and date of birth should match the document that is submitted for verification.
6. Address: The address filled in the form should match the address proof provided. There are a few sections here.
• C/o: The name of the person associated with the address proof.
• House No./ Bldg No./ Apt: Apartment number or building number
• Street/Road/Lane: The name of the street/road/lane
• Area/Locality/Sector: Provide the correct area name in the column
• Landmark: Any nearest landmark can be mentioned.
• Village/town/city: This is related to corporation, and find the correct village that your address is present.
• Post Office: The nearest post office branch name.
• District, Sub district and State: Refers to places like Chennai, and Tamil Nadu.
• E-mail: Your personal email address, to which further details and status of the aadhaar card will be updated.
• Mobile Number: To receive messages and OTP. This is the registered mobile number associated with the aadhaar card.
• Pin code: The 6 digit number that is exclusive to your locality.
Provide all the details correctly, because the address provided will be used for future communications and to deliver the aadhaar card.
7. Family details: In case of minors, it is mandatory to choose Mother, Father or Guardian and provide details of their name, and Aadhaar number. An adult can give their spouse details or choose not to specify the information.
8. Verification: Aadhaar verification can be accomplished in three ways:
• Document based: This contains four documents.
• POI - Proof of Identity, which is a document containing your name and photo.
• POA - Proof of Address, which is used to verify name and address
• DOB - This is to verify the name and DOB of the person.
• POR - Proof of Relationship. This is necessary for HoF based verification, where the name of the applicant and Head of Family is to be verified.
• Introducer based: Introducers are people who work under the Government of India, like Registrar’s employees, elected local body members, Postmen etc. This document is a secure shareable document, which can be used during offline verification.
• HoF based: HoF is Head of Family, i.e., HoF should accompany the applicant when aadhaar is enrolled. They should provide documents in which the applicant's name and the HoF's name are mentioned.
• Introducer-based or HoF-based documents are used only if the applicant does not have his own identity proof.
9. Declaration: This is to sign the form and declare that the details provided are true and correct.
Offline enrolment of Aadhaar:
i. Download the Aadhaar enrolment application form from the UIDAI website: https://uidai.gov.in/en/
ii. You can also go to the nearest enrolment center and get the form directly from the center.
iii. Fill all the information mentioned in the form, and make sure that the details filled are correct.
iv. Submit the necessary documents that are needed for verification to the enrollment center, as well as the copies that are required.
v. Give the form and documents to the operator and the operator will check if all details are present.
vi. Submit the form and the operator will provide you with an acknowledgment slip, through which you can enter the UIDAI website to check the status of the card. vii. If you are updating your biometric data, your photo, iris and fingerprint will be updated at the enrolment center for free.
Enrolment center:
To enroll or update, it is important to locate your nearest enrollment center. You can visit the UIDAI website to locate or book an appointment with an enrolment centre.
a. Locate a centre:
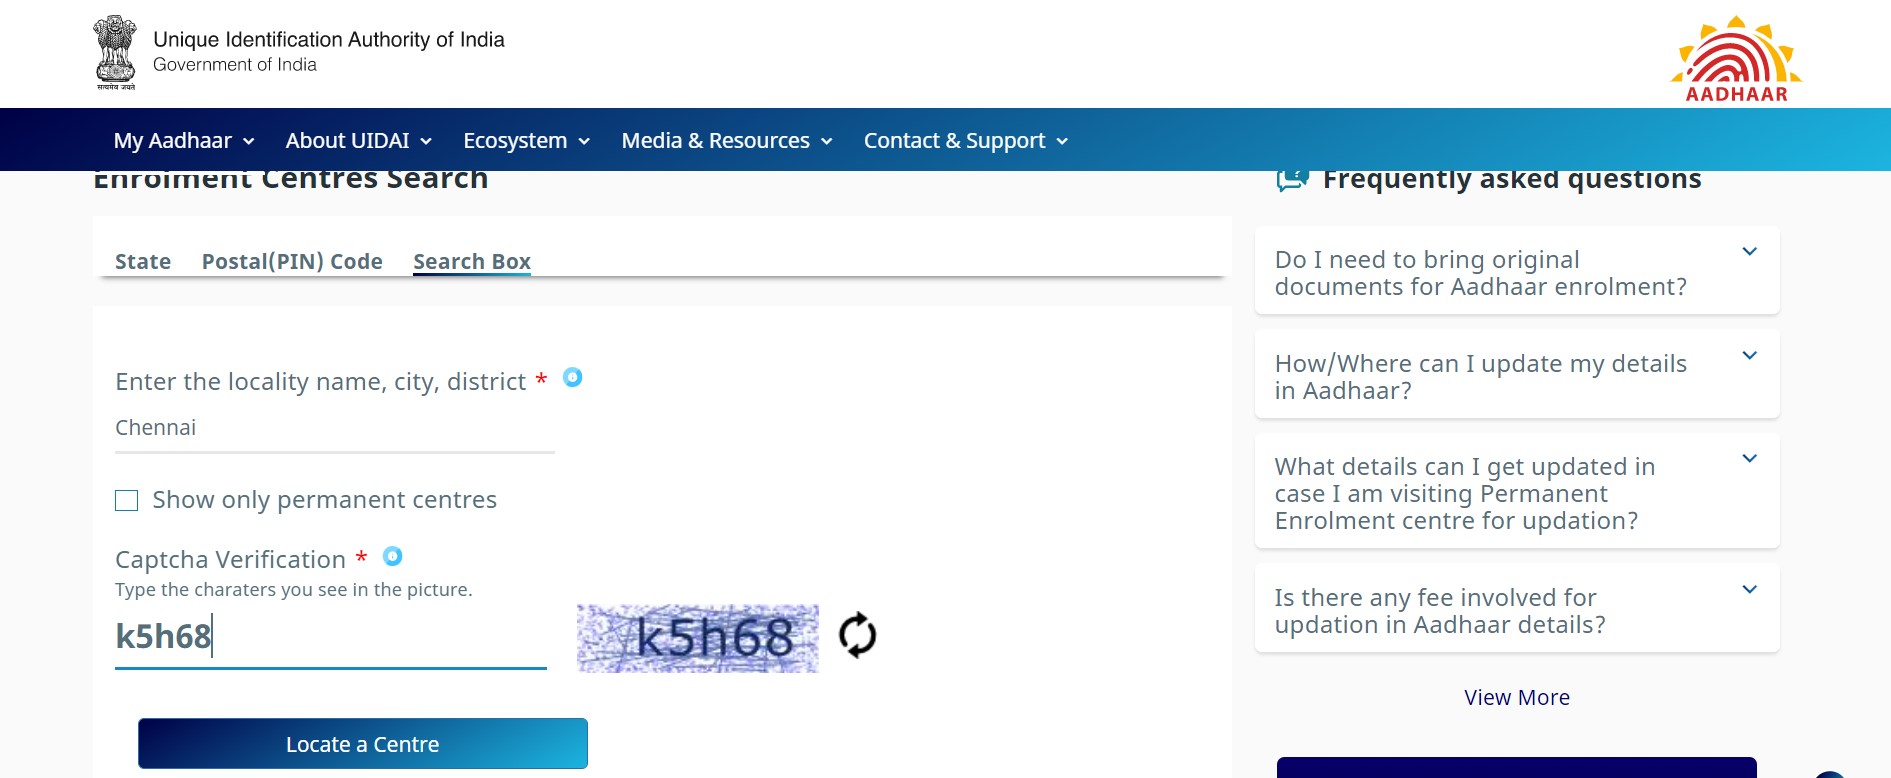
• Search by entering state, pin code or the name of locality, city and district.
• Enter the captcha code.
• Click Locate a centre to find an enrolment centre near you.
• You will get a list of centers that are present in that city or locality.

b. Book an appointment:
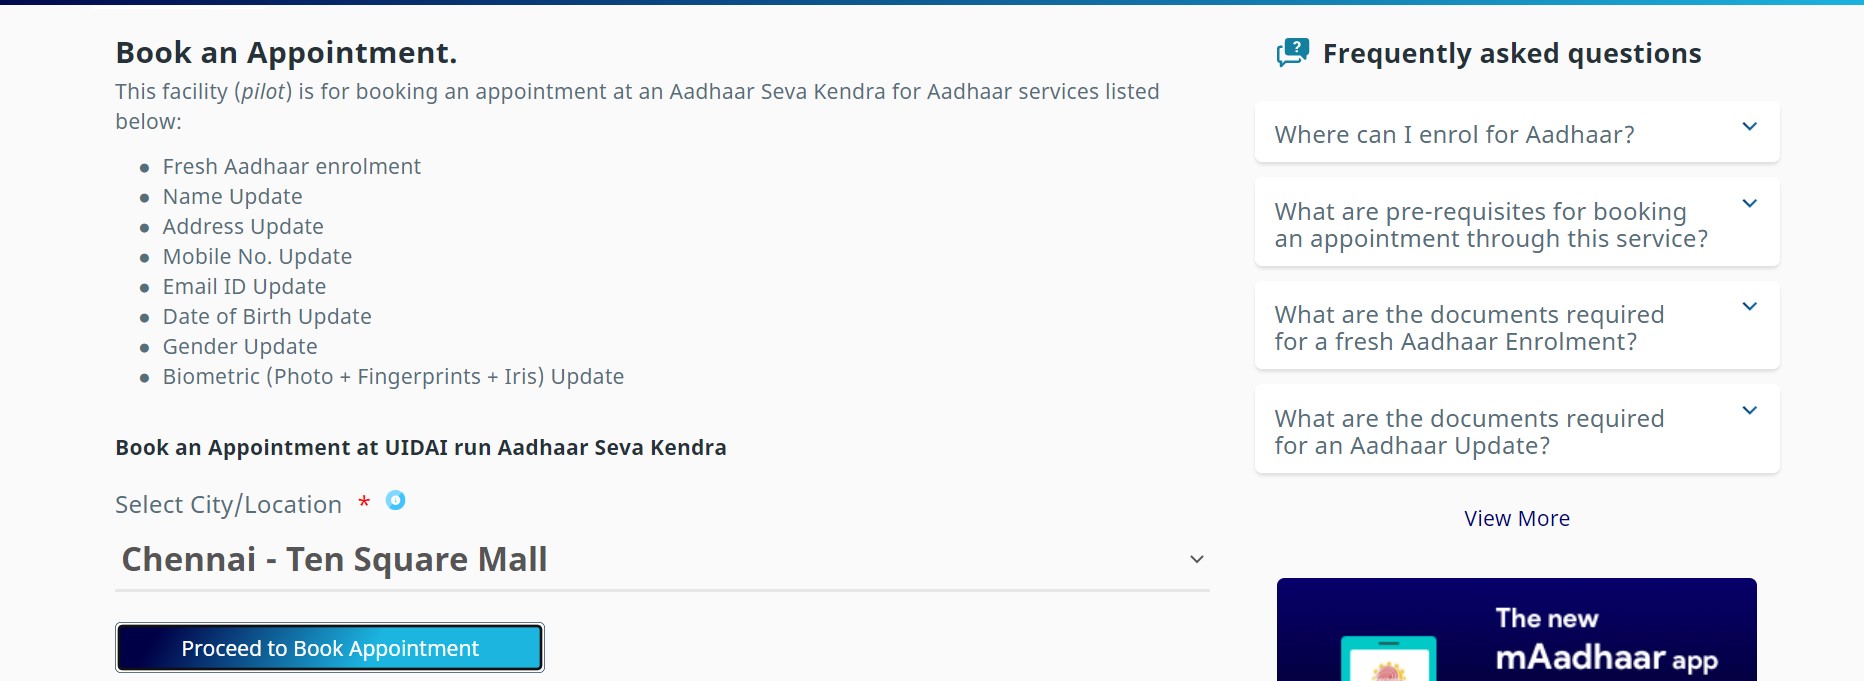
• Choose book an appointment from the UIDAI website.
• Select the city/location where you want to book an appointment
• Click on proceed to book an appointment.
• Choose if it is to update aadhaar/ to apply for new aadhaar/ to manage appointments.
• Enter your mobile number and captcha. An OTP will be sent to your mobile number.
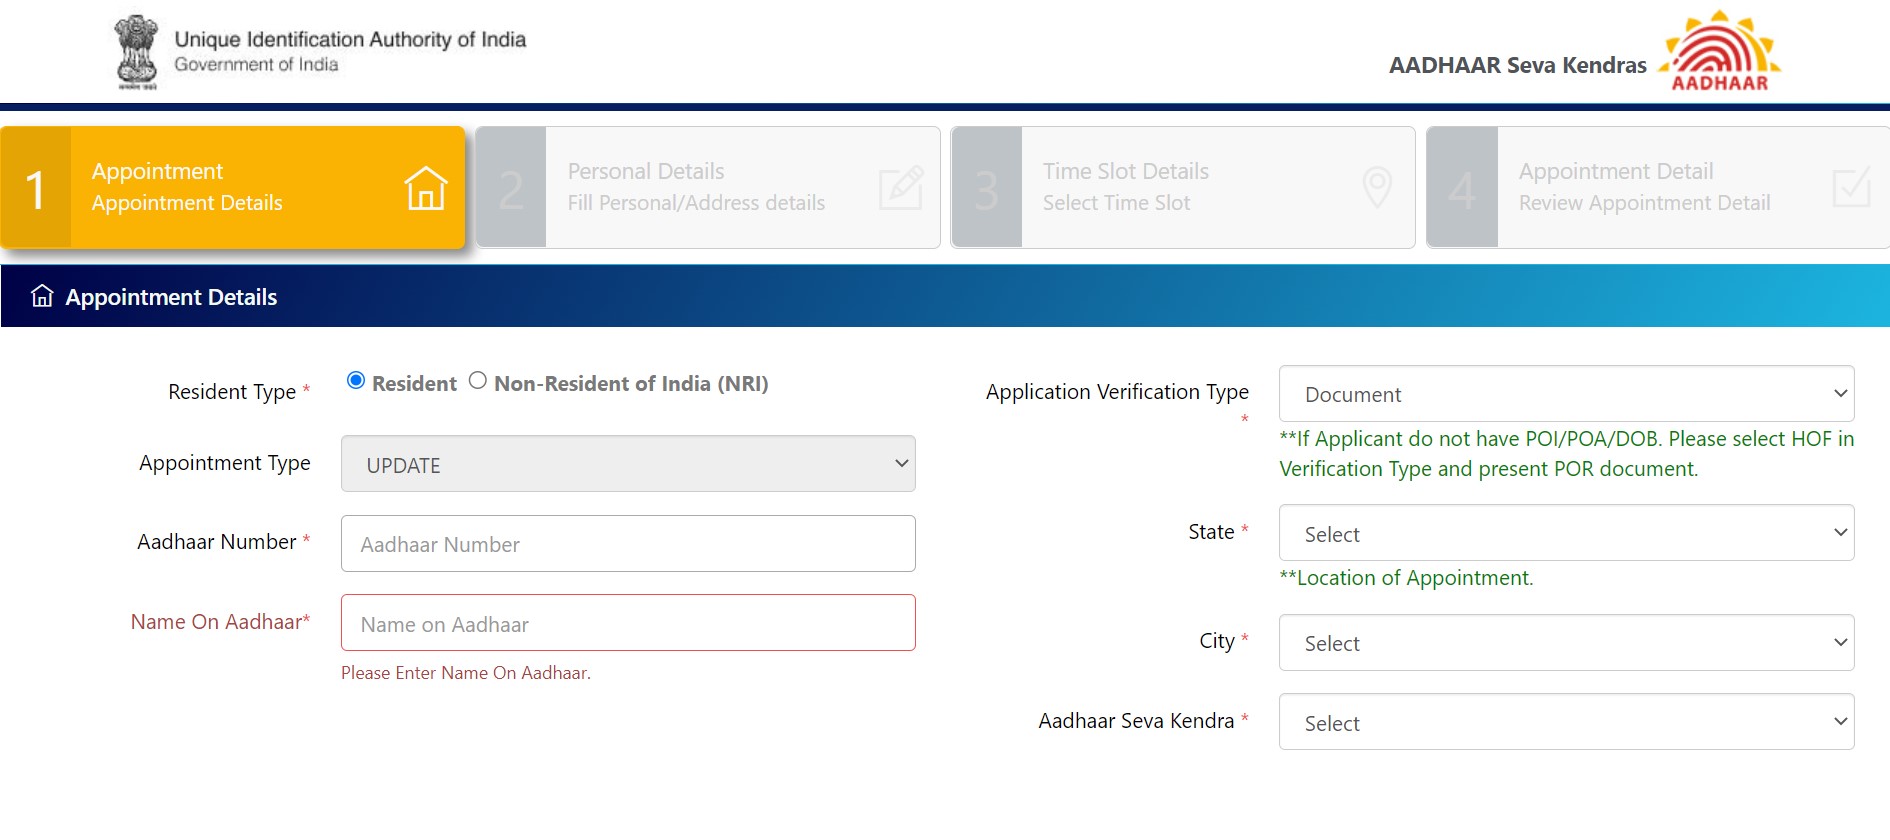
• Verify the OTP, the page redirects to book a slot. Here details like appointment details, personal details, time slot details and finally the review of the appointment are given.
• The appointment slip is needed while visiting the enrolment centre in person.
Conclusion:
Aadhaar card is a mandatory document of proof across India. If you are filling out an enrolment form, make sure you check the details before you submit it.
While entering the details in the field, use capital letters in the application form. The mobile number that is submitted should be accurate, since future updates will be sent through messages.
Make sure you read the details carefully and provide details. Once enrolment is done, visit the UIDAI website to check the status of your updated or newly enrolled aadhaar card.
Frequently Asked Questions
In many cases it has been made mandatory to link Aadhar. The instances include mandatory linking of Aadhaar and PAN by the due date of 31st December, 2019.